Showing posts with label Cricut. Show all posts

Thursday, March 3, 2011

A Class Act!

Classy right?  Well, I know this is kinda generic but it was inspired by a coming together of ideas and comments.  I was reading a thread on Splitcoaststampers about the images from Cricut being too childish.  Now you may disagree but I think this one is pretty simple and ageless, rather than childish.  I made this for my 17 year old as in the last few years he has been exploring his theatrical side and gaining more confidence with each performance.
There is a card cut on the cartridge and I used that to make the base with the black masks over the opening  I then covered those masks with an identical white cut out and another one that I had highlighted and shadowed with copics and popped up from the other white masks with some coasters I had collected.

I didn't like the "gap" around the masks as such.  I decided I would go in behind and add some texture.  I then lined the card with another layer of gold/yellow cardstock. 


Do you get the song reference with this card as well?  "Ah huh, You know what it is?" (another nod to a song that my son seems to be singing all the time at the moment though he's a Colts fan! :S ! LOL!)

Recipe
Card Size  8.5in x 5.5 in
Cardstock - The Paper Source (textured black), Recollection (white/gold)
Cricut Cartridge - Locker Talk
Cuttlebug - dots embossing folder
Color -  Copics (C1,C3)
Accessories - Cricut Expression, Cricut Design Studio

Saturday, November 7, 2009

Grungy 21st Birthday.

Hate to admit this but I think this card ranks up there with my last year Christmas cards as fun concept but...

Is it wrong to send a card you don't like? Well I have in this case. I had this concept of cutting out a large card with my Cricut - worked it all out on the Design Studio and was pleased enough with it but it needed more. So I used my Clear Dollar Stamps and Kitchen Sink Stamps to stamp guy things related to carpentry to make an insert card to the die cut card. I think attempted to personalize it and that is where it started to go all wrong. I stamp on the "R" and it doesn't stamp completely... Yikes! - so to save it I decided to shadow stamp the name and emboss it for texture. I still didn't like the look so I grunged it up so that front would stand out against the background.

Why do I have so many "guy" relatives in my life? ACK!!!!

Anyway - you honestly won't hurt my feelings if you comment that you don't like it because I'm not certain I like it either.

Ingredients
Size - 8.5in x 5.5 in
Stamps - Clear Dollar Stamps, Kitchen Sink Stamps, See D's
Ink - Memento
Accessories - Cricut

Monday, June 15, 2009

Erin's Baby Shower decorations, "cake" and card

I have had loads of fun recently with a baby shower my aunts were hosting. One of my aunts said that they had divided up the jobs and she was doing food and decorations - I said "well, for goodness sake don't buy anything without checking with me because I have loads of paper/cardstock and I have a Cricut so I can probably make something more personal than what you can buy. So she just left me to it. The directions were it had to be "pink"!!!! Cue big smilie face and the cobwebs being blown off my creative brain!!!

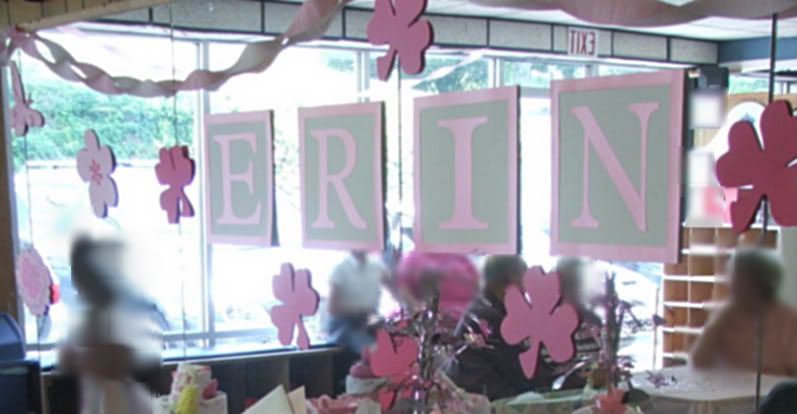
My biggest concern with the space is that we had a wall of mirrors to contend with. I don't know about you but most people I know don't like to look at themselves THAT much so I cut decorations to cover the mirrors! The pink shamrocks are because Daddy is very proud of his Irish heritage so it just had to be done with a bit of creative license. Personally though I am really happy with "thinking" about doing baby blocks for the name - I haven't seen it done before though I'm sure I'm not the first.

Ingredients - decorations

  • 2 packs of 11 x8.5 cardstock from Michaels collection - I wanted 12x12 but they didn't have it in the colors I needed.
  • Hobby Lobby textures white cardstock for blocks
  • Pearlescent Wassau cardstock for blocks
  • Cartridges - Home Decor, Plantin Schoolbook and PaperDolls

I also had to think about my card and present.

I decided to do a diaper cake from watching several tutorials on YouTube but changed things up a bit - I love this tutorial because it uses clothes pins to hold the diapers together and rolled so I didn't have to go source a lot of rubber bands and after you got the hang of it, it was pretty simple to put together this is the video I used for my main source of inspiration http://www.youtube.com/watch?v=vfwaaNjxUhY . I also only used a pack of 48 diapers as I had purchased a receiving blanket 4 pack off the mother's baby list and used one for the inside of the base and then the rest around the outside. Then I thought what is a Baby Girl Cake without loads of roses so I put loads of little sock roses all over the cake too! and then added a some teething rings, rattle, bath toy and the top layer is a onesie I printed with my Cricut using these instructions http://cleversomeday.wordpress.com/2009/04/25/freezer-paper-shirt-video/
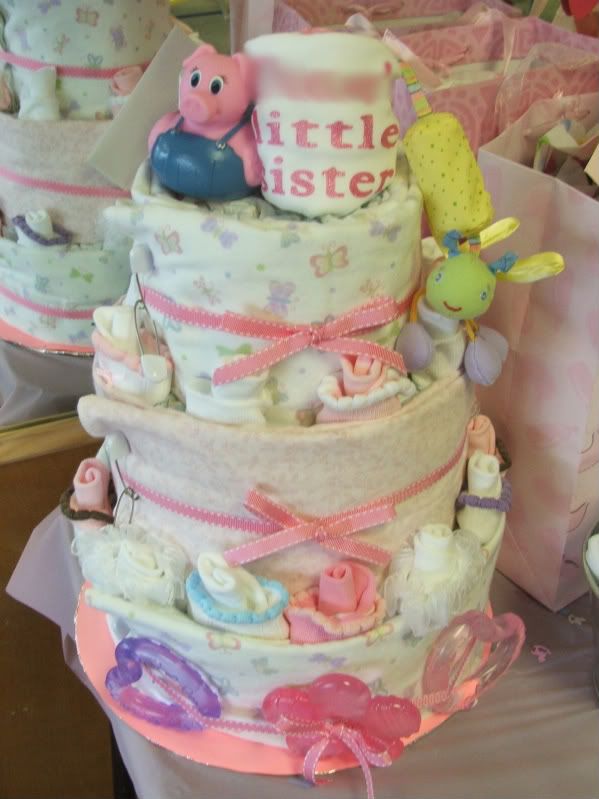
Ingredients - cake

  • 48 size 2 Huggies diapers
  • 4 receiving blankets
  • 6 diaper pins
  • 8 pairs of girl socks individually made into "roses"
  • Ribbon from Michaels
  • Teething ring
  • Bath "duck" that measures water temperature
  • baby rattle that attaches to stroller/carseat

Now for the main purpose - my card!

I really bought this High Hopes stamp to use for Baby Showers because I like to have multi-function stamps. So I just had to use it and as it turn out one of the shower games was animals and what their babies are called - at least I got the Kangaroo one right!


The inside reads "can't wait to meet your Bouncing Baby Girl"

Ingredients - card

  • DCWV - prescored card and envelope, cardstock for mat
  • Neenah Solar White for stamping
  • High Hopes stamp
  • Memento rose bud ink, Palette Noir
  • Copics - didn't get the numbers sorry folks but I will say I am thinking they were E29, E31, E33, E35, E37 and RV00, RV21, RV23 though I really that is really a guess from what I put away yesterday!
  • Nestabilities - rectangles and scallop rectangles
  • Small brad "buttons"

I have a few more projects I'm just getting done but wanted to share this one. Hope you like!

Tuesday, May 12, 2009

Cricut - Noah's Ark Name Frame

I'm a huge fan of Noah's Ark and pictures and trinkets. I love the animals. I love the boat. I love the story itself. So when I saw this post on the Cricut Message board I had to make something with the idea and then my mother told me about our friend's son "Noah" making his first communion. WooHoo! I had a project I wanted to make and reason to make it! The perfect storm!

The animals and waves are from the Animal Kingdom. The name is from Plantin Schoolbook. The house of the ark is from My Community and the boats are from Walk in My Garden (they are beehives turned upside down and stretched in DS).


Size is 20 in by 8 in.


Critical eye - the water in the goldfish bowl shouldn't be the same color as the wave it aligns with!


Ingredients
  • Frame from Michaels
  • Cardstock - Bazzill, DCWV
  • Cartridges - Animal Kingdom, Printing 101, Walk In My Garden, My Community
  • Penwork - Copic multiliner
  • Twine

I have also posted this on the Cricut Messageboard and the picture has come out larger there if you want a closer look. http://www.cricut.com/messageboard/tm.aspx?m=4567671

Monday, April 27, 2009

My first Cricut card for a "Princess"

I know I blogged a while ago about my "second" cricut card. Well, now that I have found the photo file (it was on my son's camera). I will share my first Cricut card. It is "ok" I like it but I don't love it. I think I am going to have to study the Paper Dolls cartridge a bit more and the Cricut blogs a bit more to find out what I like and don't like.

However, you know my style I don't just share what I deem my successes.
The body and hair are cut out of some Michaels cardstock. Her dress and hat are out of Waussau pearlescent cardstock. I hand drew the "banner" because I needed to get a sentiment on there and there wasn't much room left. I then stamped the banner with See D's sentiment stamp. And of course a Princess needs her bling factor so I dotted stickles all over the hat and the along the hemline and neckline of her dress.
Please feel free to give advice on what I could have done to make her "better" - From my perspective maybe a bit of shading. I know I don't like it but I'm a bit perplexed on what to do to make her "better" LOL
The little lunchbox is covered in cardstock from DCWV.

Wednesday, April 15, 2009

Mother Expression

I got a Cricut Expression in the Black Friday sales (the friday after Thanksgiving) and in its box it sat until mid January when I got it out to do a quick card - yeah right!?!?! Plus my creative mojo seemed to be completely hungover and really was no where to be found - it was so bad that I am considering trying to get substantially ahead in my card crafting which I have never done before.

I had this vision of a card with "Mother" going down the side. ARGHHHH! I'm going to have to tackle Design Studio too. Yikes! My brain panicked. So I played with DS and got discouraged and left it for another day. When I struck up the courage again I played and got it sorted out with a bit math on my computer calculator. I picked my card stock, a lovely pearlescent blue - it was going to be a "jacket" for a base card. Well that was the original thought. In the end I thought it would curl too much so I cut it down to be a mat on the card base.

The daffodils are traditional in England for Mothering Sunday which is where this card was headed so that was the inspiration for the pot full of them.

I'm trying to use up supplies so the daffs were from Michaels cardstock that I have plenty and the pot and base card are Bazzill. I used pearlescent chalks on the flowers and pot for dimension and stickles on some of the leaves to add a bit of bling.

I think I would have been happier if I had layered the letters of the "MOTHER" on the side but I just couldn't work out how and it needed to hit the postbox. Hope you enjoy my attempts with my Cricut.

Ingredients
  • Card size - 8.5 in x 5.5 in
  • Cardstock - Wassau, Georgia Pacific, Michaels
  • Cartridges - Plantin, Walk in my Garden
  • Color - Pebbles Inc pearlescent chalks, Stickles
  • Ribbon - Michaels