Tuesday, July 22, 2008

Ipod and Jeans Birthday

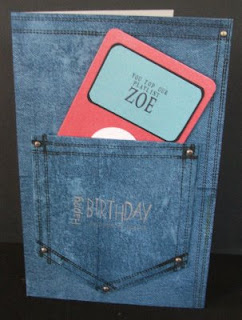
Well, take a great card and a great stamp that you can't find anywhere and sulk about it for six months and this is what you come up with. However I digress and should start at the beginning...

In January I found this great blog entry Just Give Me Stamps and like everyone that sees a great card I HAD to have THAT stamp... well I search and search and no luck so I decided to think outside the box. I ordered a denim backgrounder from Cornish Heritage Farms.

I started this card with 2 sheets 5.5in x 8.5 in white GP cardstock that I wiped faded denim distressed ink over. I then took my denim stamp and stamped over the cardstock to get the jeans look. Playing with the Scor-pal I made gussetted folds the pocket would hold the "Ipod". I then stamped the stitching with Graphite black ink (and yes I hold my hands up that the stitching could have been neater but heck, these are old jeans *WINK*). Then with the cropadile I punched through the layers of the pocket and once in the upper right corner of the card base and attached the brads. Then I attached the front to my card base and stamped the See D's Happy Birthday greeting on the pocket with platinum planet.
Now on to the "Ipod" - I took a sheet of pearlescent cardstock and cut it at 3 inches. Then I took the Scor-pal and scored it at 6 inches and also 1.5 inches from the ends. The screen is blue pearlescent cardstock backed with black and the circles I cut with Quickutz cookie cutters circle dies (my circle Nestabilities came the day after I finished this!). I then got my Just-rite monogram Stamper out and made the sentiment for the screen. The folds on the inside of the ipod are just the right size to hold a nice check (cheque for you Brits) as well!
So I'm hoping that this is just about the perfect card for a teenager no matter what their interests are!

Thursday, July 17, 2008

A Justrite gift!

I picked up the Just-rite monogram stamper last Wednesday and was so excited to get it out of the box then I thought I was going to have to stand on my head to get the border on - I found out on SCS that I had a defective one so I contacted Just-rite directly and told them my problem. They emailed me right away and we sorted it out and I received my replacement stamper in the mail on Monday! Can you believe it what great customer service that is? So a Big Shout out to the Just Rite time and just in time so I could make this gift to send to my neice.

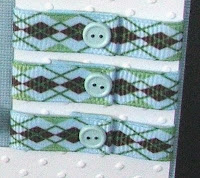
I took a leaf out of Lauren Meader's blog entry and did the first name and then last initial. My color choices were dictated by the ribbon. I cut my circles with my Quickutz cookie cutter dies - my nestabilities circles are making there way to me at the moment but alas too late to get this done and in the post. I inked up my monogram stamper with some Versacraft cherry pink. The small dots in the border are highlighted with Sakura clear glitter pen. The green cardstock is from a selection I picked up at Wally's world and has a slight sheen too it - I just had to run it through my cuttlebug paisley folder!

The folio idea I picked up while surfing on Splitcoaststampers. I made by playing around with numbers and my scorpal - there are still a few tweaks to make it better and I am certain there is probably a brilliant tutorial out there that I just couldn't find when I needed to get this done... in the end because of the thickness of the note cards I went back and scored in gussets where I could to accomodate this. I decorated the front of the folio using the same cardstock through the cuttlebug with the cuttlebug paisley die that I just had to have and then hadn't used.

I also sent my neice a birthday card with this set. I will post that next time!

Oh and I have added a link to the side where you can get FREE TEMPLATES to use on your own or with your cricut and I think sillouette so have a look!

Recipe
Ink - Versacraft cherry pink; Sakura clear glitter pen
Dies - Cuttlebug
Embossing - Cuttlebug
Embellishments - Michael's ribbon
Paper - Georgia Pacific and ? Colorbok
Cardsize - notelet (4.25in x 5.5in)

Tuesday, July 8, 2008

Ladybug? Ladybird? Graduation Card.

I never know what to call an "LB" anymore - Ladybug is American, Ladybird is British so I think the darling little bug will just be LB from now on! LOL.

This card is for my Auntie in Alaska who just graduated college for nursing! WOOHOO! She absolutely lurves ladybugs so I took my inspiration from there. I decided to use the swiss dots cuttle bug folder to emphasize the dots on the LB and again I chose the ribbon to tie in. The circle was cut from the front layer first and is a Quickutz cookie cutter die. I put the solid circle aside and put the cardstock through my cuttlebug with the swiss dots folder x 2. I then used my Fiskars trimmer to score two lines and then stamped my greeting from Hampton Arts. I then measured my greeting so I would know where to score the bottom two lines and flipped the cardstock over and scored. After that I sent it through with my swirls folder. I then went over the top of the Congratulations with a graduation cap stamp and my versamark and clear embossing powder. I placed the organzaa ribbon to highlight this and be a color tie to the main image. I then mounted this on the black card base.

The lady bug image was stamped with Brilliance Graphite Ink and colored in with Sakura glitter pens. I then went around the circle making dots my black marvy pen. Then I just had to tackle the "nekkid" envelope too! This time I colored in the LB's with permanent red ink. This was added to the "hole" I had made earlier using 3-D Zots for dimension. After I took the picture I added an insert with a LB on the corner too! I really hope she likes it!

Sorry for the blurry close up! just trying to show the elements together and the clear embossing!LOL

Ingredients
Ink - Brilliance Graphite Black
Stamps - Unknown, Hampton Arts
Embossing - swiss dots, devine swirl, Fiskars trimmer
Pen- Marvy, Sakura

Monday, July 7, 2008

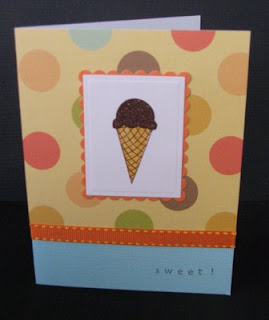
SWEET!

This is a notelet sized card that I made to send to my "cardies" last month, as one of our group calls us! The stamps are from a too cute set from Technique Tuesday called "Icing on the Cake". I wanted to use this set and really started off thinking about cupcakes - I mean have you seen all the fabby cupcake cards there are around and then I thought - HMMM maybe I should just save cupcakes for birthday cards because I have so many of those to do - well for me - and can never think of an idea and who doesn't like cupcakes etc. So after I finished my internal dialogue with myself. I decided it is summer and I NEED some ice cream and even better this is the ZERO calorie kind. Now we are talking!

So this card started with cutting and embossing the white cardstock out with my new nestabilities (oh I love those things!) I stamped the icecream stamps on the cardstock using versamark for the ice cream itself and gel-a-tins chocolate embossing powder - yum! Its not an overpowering smell but it is there! I also made a scalloped frame for them, at this point I chose orange - I just think it so refreshing for summer and I had already played around and decided that I would have chocolate ice cream and then the blue base card just seemed to make it come together. Then I went looking through my designer paper that I had bought ages ago and had never used - you know when you think its too good to use! and found this K&Company Brenda Walton Neopolitan paper - now how perfect is that! (I know you probably already knew about it!). I just then had to sort out a sentiment for the front and some ribbon and Voila!
Ingredients
Stamps - Technique Tuesday, Stampendous alphabet
Ink - Adironack Caramel, Adirondack Expresso, Versamark
Embossing powder - Gel-a-tins chocolate bliss
Diecutting - Nestabilities
Designer Paper - K&Company Brenda Walton
Embellishment - ribbon from Michael's

Friday, July 4, 2008

4th of July Birthday!!!

I guess I really should have more subtle titles - or maybe just sub titles as I know my brain and my thoughts don't always marry up!

Well today is a very special day - it is our entire little family unit's first 4th of July together or as the DH calls it Colonial Day. Honestly how can you argue with him! lol His uncle used to tease me that England were just seeing if the US could manage on their own... that was over 15 years ago, I think he may have been on to something. HMMM

I guess I better give you the heads on the card - its for a dear friend of mine in England - I have to say I was inspired by the artwork of this blog http://zindorf.blogs.splitcoaststampers.com/ (I know the work there is fabulous but keep coming here too please! I'm begging you here people! LOL)


I stamped my main image from High Hopes and colored her in using prismacolor pencils and baby oil. I then framed the images using the star border from Technique Tuesday stamped with platinum planet ink and clear embossed the stars. I decided to mask the main image and then sponged Distressed Ink in Fired Brick and then in Faded Jeans. I then stamped my denim background from Cornish Heritage Farms using my Adirondack denim pad. The stars are quickutz diecuts and then colored with the Fired brick and the platinum planet and adhered with 3D zots. The See D's greeting was stamped with the Adirondack denim pad and then highlighted with the distress pads. The card base is Archiver's own cardstock linen blue.

Hope you like and have a safe and happy 4th of July!

Ingredients:
Stamps - High Hopes, See D's, Technique Tuesday, Cornish Heritage Farms
Color - Prismacolor pencil
Ink - Adirondack, Distress ink, Brilliance
Dies - Quickutz

Tuesday, July 1, 2008

Bouncing Baby Boy!

Another boy card! Thankfully I just have these too cute stamps from High Hopes - it just makes it difficult to decide which one to use! There really must be something in the water with all these boys!
I AM happy with this card, I have to say. Though it is nothing like my original vision in my head! Does anyone stick to their original idea all the way through a card? I was inspired by the Heartprints Gallery - some really amazing things there! I actually started to do this as an all white front with the Kanga on a raised embossed section - although "nice" it was just too white for me! So I made my swiss dots embossing into a frame (had to send that baby through twice AND poke some of the dots back out with my embossing tool). Kanga is now cut to show the shading and raised from the base with 3-D Zots. BTW - this card is 5x7 - I just like BIG cards for BIG occasions!

I really think I need a Scor-pal. I have been trying to talk myself out of one but I just don't seem to be able to get the nice deep grooves that so many people are getting without one. The ribbon is attached with the brad alone thanks to my cropadile through three layers of ribbon and one layer of card!

Gotta love that Baby Oil technique and any residual "smell" is just oh so perfect for this occasion! LOL

Hope you like!


Recipe:
Cardstock - Georgia Pacific, DCWV pastel blue
Stamps - High Hopes
Ink - Adirondack Espresso, Brilliance Graphite
Color - Prismacolor pencils
Embossing - Cuttlebug folders - Swiss Dots and Perfectly Paisley, Fiskars trimmer
Ribbon - Michael's
Brads - Making Memories