Showing posts with label DCWV. Show all posts

Saturday, March 5, 2011

3D Hydrangea card.

I really like how this card turned out.  What do you think?  It's the birthday card I sent my dear Mother-in-law.  It was quite time involved but pretty simple to put together in the end.  My general stamping style isn't "pretty" but I think this actually fits in the pretty mode.  I had to post this so I hope it survived its 4,000+ mile journey somewhat in tact.  I think if it hadn't my Mother-in-law would have said. 
I can't really say how this card came about...if you are into reading, it was a very stream of consciousness event.  I was playing and inspired from a variety of sources. 

Last year I made my MIL a really involved card with multiple layers of stamping, embossing etc.  So I knew I had to come up with something at least equally as good.  I was playing with my hydrangea punch in January just punching card excess from the previous pink card and playing with my embossing stylus to see just what it took to make those magnificent flowers I have been seeing everywhere.  Well, by the end of television viewing time with the family that night I had quite a few formed blossoms in hand!  I had to decide if/how to incorporate them on a card for my MIL.  I went through my stamp collection and found out the Kitchen Sink Stamps Hydrangea set... hmmm... lets take this dimensional like a photo and have the stamped hydrangeas set the scene and the 3D one as the focus.  I was also inspired by the clean look from the Simplicity blog and the CAS threads on Splitcoaststampers.  I decided to use my memento ink and just go tone on tone on tone for the step process to keep the focus on the main bloom.  I finished off the 3D blooms by gluing a small pearl in the center of each and then mounting most of the petals on pink circle to have the ability to play with the placement.  After I placed the circle of petals on the card base, I then added more to make the blossom look more organic.

Recipe
Card Size - 8.5in x 5.5in
Cardstock - Neenah, Recollections (pink), DCWV (green)
Ink- Memento (Angel Pink, Bamboo Leaves)
Accessories - pearls

Wednesday, February 9, 2011

A planted wagon of Birthday Cheer.

I'm still trying to decide what I think of this card.  It just seems to lack something but everything I tried to add went wrong so I went with the less is more approach.


So what do you think?  Over cooked it? Under cooked it? or just right?

I started by selecting the image for this card and then the cardstock I wanted to use for the background.  After that I chose Copics that matched the background cardstock.  I then colored some white brads with the copics to match the image and help with the bling factor.  I added glitter pen to the middle of the flowers to help pep up the image.

I wanted it to be bright and cheerful as I was creating this for our lovely Auntie in England who is in her 80s.  I know she has some sight issues so I hope the card was bold enough for her to enjoy it.

Recipe -
Card Size - 8.5 in x 5.5 in
Cardstock - Neenah, DCWV 
Ink - Memento Tuxedo Black
Color - Copics
Accessories - White & black brads, Martha Stewart punch, Sakura glitter pen

Saturday, October 2, 2010

Cricut floral bouquet

Boy did I have fun with my cricut making this!  I decided I wanted to make a flower pocket card that was shown on Splitcoaststampers but of course I had to add a twist and make it LARGE because this was for my husband's auntie who turned; oh wait should I say? After all she is a woman, but you know when I get to the grand ol age of 70 I would be proud of the fact.  Oh wait! That said I knew she was celebrating a very special day but I didn't think we had to advertise it any more than being more elaborate for her extra special day.  Now Auntie Jen loves her garden so I already knew I was on a winner with anything floral, but truthfully I wanted it a bit more "special" than a flowerpot.  So I was browsing my Cricut cartridge for flowers and saw the triple vase and thought - oh I can just fold that to make a the bottom and cut another to be the front AND be able to fold the one on the very back to make a stand so the card will stand up on the side with her others and only as a nice vase of flowers should do.  (How's that for a run on sentence?).  Now you know in general I make my cards and especially special occasion cards BIG no petit 4.25 in x 5.5 in card for this project.  No way would that do.  So I played with layouts on design studio and made this baby stand 8.5in high and 5.5 in wide.  What do you think? Too Much? 

Of course in the end I was in a hurry to photograph and mail this overseas so I didn't get a picture of the inside, the side view (of the stand) or the extra embellishments on the back to attempt to make this extra special.  D'oh!

I did however manage to capture the bling of the glitter glue and rhinestones! Hooray!  That bottom pink flower and some leaves as well as the butterfly are actually adhered to the vase portion of the card and the rest at part of the pull.

Now for the second part of this story.  My darling husband travelled t'over pond to visit his family and of course his aunt and just happened to be there when the party was on.  His mother was quite concerned that he didn't have a card on him to give his aunt and he kept assuring her he was certain that we had sent a card and not to worry but of course she did.  They walk into the party and looks across the room and says "There it is mum - the one with the butterfly"... now I don't know if I would have described the card as the one with the butterfly but it did make me laugh that he could identify it by one element.  Men!

Recipe
Card size - 8.5 in x 5.5 in
Cardstock - Recollections, DCWV, Neenah
Ink (not seen) Memento
Stamps (again not seen - YIKES) - Kitchen Sink Stamps
Accessories - Cricut Walk in my Garden, glitter glue, chipboard coasters for dimensionals, rhinestones.

Wednesday, September 29, 2010

Pink first communion card

I guess the title speaks for itself.  This is a card I made for my cousin's first communion.  She is a very girlie girl so I went all out.  The cross really sparkles with the embossing powder.

Recipe
Card size - 8.5in x 5.5in
Cardstock - Neenah, DCWV
Stamps - Clear Dollar Stamps, Kitchen Sink Stamps
Ink - Versacolor
Accessories - iridescent embossing powder, nestabilities, prima flower, brad, grosgrain ribbon

Friday, September 24, 2010

Time flies... well at least when I forget to blog it seems to!

OK you are going to have to bear with me as it has been a few months since I created these. I will tell you from the start I don't have the copic colors I used for these next few posts. Also they are all going to be pretty short, sweet and to the point.

This card is for my Sensei's wife's birthday. My Sensei is pretty highly trained in Okinawan Karate so I thought she was appreciate the thought. She did. She gushed that she loved the colors and they are exactly what she wanted to redecorate one of her rooms in! I love it when things go so right.

Recipe -
Card size - 5.5 in x 8 in
Cardstock - Neenah, DCWV
Ink - Memento
Stamps - Hero Arts, Kitchen Sink Stamps
Color - Copics
Accessories - Nestabilities, Martha Stewart punch, Prima flowers, brads, ribbon

Sunday, February 7, 2010

Hello friend!

Oh dear...

I think I said I had already posted ALL my 2009 cards... well you can understand that I meant my 2009 Christmas cards right?LOL

This is a card I made for a dear friend whose birthday is at Christmas time and I like to send her birthday cards that don't look like Christmas cards with "Happy Birthday" on them.

I really like how simple this was and how it turned out.

Loads of rectangles to compliment one another and a great patterned cardstock from DCWV. I cut apart a Stampendous phrase to keep it short and relevant, and guess what! no stamp police came and hunted me down for doing that! LOL.

Ingredients
Card size - 8.5 in x 5.5 in
Cardstock - Neenah, DCWV
Stamps - High Hopes Stamps, Stampendous (greeting)
Ink - Memento Tuxedo Black, Canteloupe
Copics - B000, B00, B93, B95, B97, E00, E02, E11, E31,E33,E35, G000, G00, G02, G05, G07, G14, G21, G28, R20, Y11, Y15, Y17, YR02, YR04, YR07

Thursday, February 4, 2010

Christmas 2009 - BIL & SIL

As these are now last year's Christmas cards I am trying to KISS (keep it simple stupid) them. If you want to know more let me know, but it's all pretty self explanatory.
This card was for my BIL and SIL. I think it may be my favorite of the two individual cards I sent. I used my large cuttlebug holly embossing folder and then just colored over the raised holly with my copics and red spica pen. I colored the ribbon to match with the same pens and the "drops" are clear floral pebbles from Michael's that I color the back to match.
Ingredients
Card size - 8.5 in x 5.5 in
Cardstock - Neenah, DCWV
Embossing folder - Provocraft
Color - Copics G17
Ink - Memento Lady Bug Red
White grosgrain

Sunday, November 15, 2009

Happy Birthday Fossil Chops!

What else do you say to a prim and proper 81 year old lady on her birthday?

This is a long standing joke between us and Auntie M. Nearly 20 years ago (pre-cardmaking) we found this rather jokey card about how wonderful the person was etc and then inside it said "Happy Birthday Fossil Chops!". Well we mischieviously thought we would send this card to our Auntie M. The thing is Auntie M is the typical little proper little lady (think Laura Ashley, tea, crumpets and you start to get the idea) and most people send her appropriate cards with scenic landscapes and beautiful flowers... We knew she had a sense of humour, after all she was married to Uncle D, anyone that survived being married to Uncle D had to have a sense of humour. So alas, we plotted to send her the highly inappropriate card and Auntie Fossil-chops was born! She loved the card and had to show it to everyone she came into contact in her daily life.

When I set out to make this card I was reminded of the fun of that time. Auntie M is alone now, Uncle D died a couple of years ago now, after a brave battle with Leukaemia. Our hope is that this version of the "inappropriate" card will become a new source of entertainment and spark fond memories of that time.

Ingredients
Stamps - High Hopes Stamps
Paper - DCWV, Neenah, The Paper Source
Copics - G00, G00, G02, G05, G07, Y00, Y02, Y08, B000, B00, B02, B05, YR02, YR04, YR07, R22, R27, R29, C1, C3, 0


Tuesday, November 10, 2009

You Rock!

Well you know you do! And so does the recipient of this card too!

I stamped the Stampendous image and went with blues - I tend toward red guitars but I wanted to be slightly less predictable. I colored both the base image and the second popped image with Copics. I then stamped the sentiment and adhered the second guitar on top of the first and matted the image in black. I put the three brads on it to echo the silver of the background image.


As you can see, because of the foiled paper it was a bit of bear to photograph. I went for a clear picture with a close up to show off the foil!

Ingredients
Card Size - 8.5 in x 5.5 in
Cardstock - Neenah, Georgia Pacific, DCWV, The Paper Source
Ink - Memento

Stamps - Stampendous, See D's
Copics - C1, C3, C5, B23, B24, B29
Accessories - 3 silver brads

Monday, November 9, 2009

Hipp O'Birthday!

I love this image I got from High Hopes! I never thought of myself as cutesy but I guess I am. I tend toward young images rather than overt realism. I guess I like the fun fantasy of them and the kick toward being young at heart. I do love the effects I get with my copics in coloring in our purple hippo. I decided to take a nod from the High Hopes Stamps though made my hippo more purple than theirs. Theirs has more pink tones but I shyed away from the pink tones as this is for a boy.


I also like the color combo of orange and blue and wanted to use up some of my patterned cardstock stash - so pretty but I struggle to use it!

With my critical eye I think there are two things I could have changed about this to just make it pop that much more. Use a co-ordinating green in the image itself and vary the grounding color from the shadow.

Ingredients
Card Size
- 5.5 in x 8.5 in
Cardstock - Neenah, Bazzill, DCWV
Stamps - High Hopes Stamps, Stampendous
Ink - Palette Noir
Color - Copics - BV00, BV02, BV04, BV06, BV08, YR02, YR04, YR07, B000, B00, B02, B05, R27, R29

Tuesday, October 27, 2009

Bugging a Tomboy birthday!

I think this has to be my favorite card I have made recently.
There were several things I wanted to accomplish when I made this card. I wanted the image to be of a not so girlie girl and for you to get the impression that although there is a bow in her hair and a flower in her pocket that the bow is there because her mother put it in and she is far too engrossed in tomboyish pursuits and discovery to worry about it.

Secondly I wanted to use a quirky color combo that was actually inspired by some early Halloween cards that I had seen (take that hot pink and make it purple and I think you will see what I'm talking about).


I chose my colors of cardstock first before I started to color my image, so that my color choices would compliment the image. After I colored in the little girl in Copics I decided that my glass jar would look a bit green around the edges I had already decided the bugs would have a glow about them when I colored her face in so I just went for the yellow glow. Of course because the girl isn't too girly the bugs and flower had to be sparkly so they got clear Sakura stardust on them and then what you really can't see in the pictures is that the glass jar was cover in glossy accents.

The patch on her knee reminded me of my heart Nestabilities and I looked at them and decided I wanted the sentiment to be subtle so I embossed the heart with my cuttlebug folder before cutting it. You can just see in the main photo how the ribbon goes through the heart and I debated ages about adding the brad and finally decided to do it. What do you think?

For the inside of the card I decided to use the negative of the scalloped heart as a mask to pounce the inside with color and stamp the sentiment over.

Ingredients
Card size - 5.5in x 8.5in
Cardstock - Neenah, DCWV, Michaels
Stamps - High Hopes, Kitchen Sink Stamps
Ink - Palette noir, Memento Rose bud, Memento Tangelo
Copics - E00, E02, E93, G000, 05, Y00, YR00, YR02,YR04, YR07, V15, V17, RV02, RV04, E33, E35, E37, C1, C3, C5, C7, B000, B00.
Accessories - grosgrain ribbon, brad, Nestabilities, Cuttlebug embossing folder, cropadile, Sakura stardust clear.

Monday, October 26, 2009

Stephen King's Christine for your birthday? Are you scared yet?

The recipient of this card (the Dear hubs) opened it and looked at me and somberly said, "What have I done to you?" I looked at him rather blankly and said "What you don't like the card?" He replied "You've given me Christine! What are you telling me?" and gave me a big wink... I burst out laughing. All day I kept being ribbed about giving the gift that keeps on giving like Christine did in the Stephen King movie/book.

Honestly I just liked how the color combo went together but if it keeps him worried then that isn't a bad thing. Right? LOL!

I particularly tried to pay attention to shading and how the sky would be clearer behind the windshield but there would still be a tint of color.

Ingredients
Card Size - 8.5in x 5.5 in
Card - Neenah, DCWV, Bazzill
Stamps - Clear Dollar Stamps - Cruisin Classic
Ink - Memento Tuxedo Black
Color - Copics 0, C1, C3, C5, C7, R32, R35, R37, Y00, Y06, Y08, B000, B00, B02
Accessories - grosgrain ribbon.


Tuesday, October 20, 2009

It's all about Zoe! and learning how to alter the collection I have amassed!

This is a whole gift set that I made to send to my neice for her 16th Birthday. I thought it turned out pretty cute. I got this We R Memorykeepers paper pack with purchase at Archivers and thought it was quite funky and youthful (which probably means it isn't - LOL). I know there is nothing "new" here to rock the blogging world but just a bit of sharing. I went to cover the letters and they are taller than my 6x6 paper so I thought I would embellish with ribbon at each end and in the middle of the "o". The ribbon "blossom" I have seen everywhere but didn't bother reading any instructions I just threaded ribbon folded on an angle on thread and tied it off and that is what I got. I went through my brad stash and liked how the brad echo'ed the dots in the paper and added a bit more whimsy. Then added some clear Michaels "dew drops" for a little bit of bling and edged each letter with white grosgrain ribbon to finish the edges, which was probably the most difficult part.

On to the next part of the gift - notecards! I liked mixing it up with the paper selection and the DCWV cards I had picked up in one of the Michael's sales ages ago. With my Nestabilies, my Palette ink pad and my JustRite Stampers I think they came out pretty cute. So just bear with my proud mamma moment...
And then there is this one! I think I frugally love it the best because I just used the ends that I cut off from all of the cards above to make it!

Then I was stumped! Yikes - I need to package these. How about a cute ribbon. No. That didn't work. It looked sloppy and it might come undone on its trans-Atlantic journey. What can I do? I will have to make a box of some sort. So I got out my Scor-pal and played.


oh wait!
There is something more!

I can't fool you - you saw them above didn't you?

I had to throw in some beaded pens. This time I put the patterned paper inside the pens and covered the pens with microbeads and then sealed them with Glossy Accents. I forgot to tell her the pens are refillable so I will have to let her know and that she can put other patterned paper in them because of how I did them.
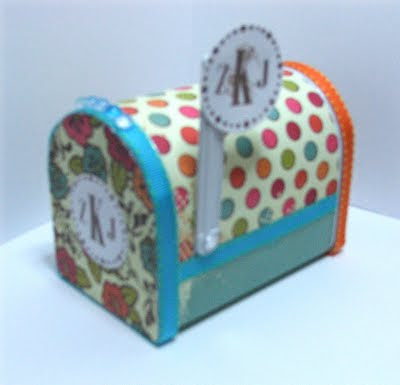
Then I just had to have a go at a mini mailbox - perfect to send a few post-it notes

I would have loved to put some stamps in the mail box but she is overseas so that wouldn't really work. I also added loads of fun school supplies. She is planning on training to be a Nursery school/Pre-school teacher so I hope all the little fun supplies will come in handy with her school work or just be whimsical play for her.

I think these are the first set of alterables I have done so I'm pretty pleased with them - hope you like.

And thanks for the previous comments - I do my blog to keep my friends (past, present and future) up to date with my hobby, but its always nice when someone likes something and tells me! I really need to make more effort to leave some blog love!

Hopefully the ingredient list for this is pretty straightforward so I won't bother with this post.

Monday, June 15, 2009

Erin's Baby Shower decorations, "cake" and card

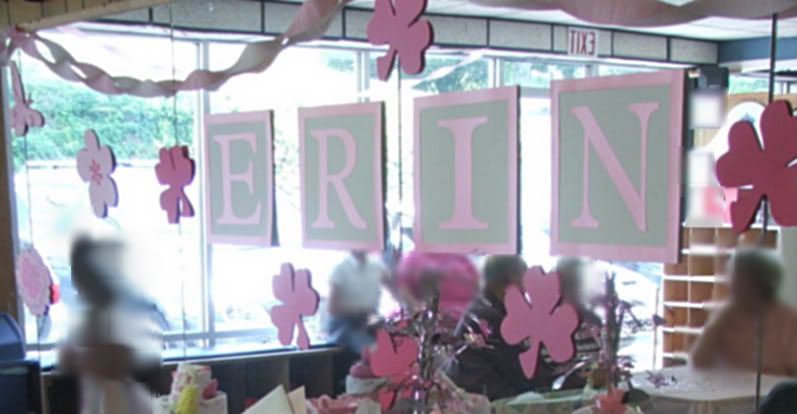
I have had loads of fun recently with a baby shower my aunts were hosting. One of my aunts said that they had divided up the jobs and she was doing food and decorations - I said "well, for goodness sake don't buy anything without checking with me because I have loads of paper/cardstock and I have a Cricut so I can probably make something more personal than what you can buy. So she just left me to it. The directions were it had to be "pink"!!!! Cue big smilie face and the cobwebs being blown off my creative brain!!!

My biggest concern with the space is that we had a wall of mirrors to contend with. I don't know about you but most people I know don't like to look at themselves THAT much so I cut decorations to cover the mirrors! The pink shamrocks are because Daddy is very proud of his Irish heritage so it just had to be done with a bit of creative license. Personally though I am really happy with "thinking" about doing baby blocks for the name - I haven't seen it done before though I'm sure I'm not the first.
Ingredients - decorations

  • 2 packs of 11 x8.5 cardstock from Michaels collection - I wanted 12x12 but they didn't have it in the colors I needed.
  • Hobby Lobby textures white cardstock for blocks
  • Pearlescent Wassau cardstock for blocks
  • Cartridges - Home Decor, Plantin Schoolbook and PaperDolls

I also had to think about my card and present.

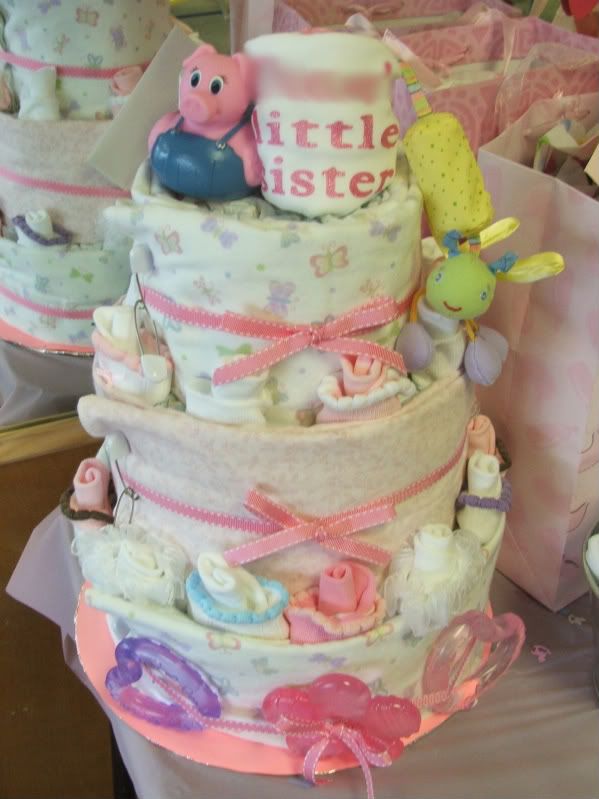
I decided to do a diaper cake from watching several tutorials on YouTube but changed things up a bit - I love this tutorial because it uses clothes pins to hold the diapers together and rolled so I didn't have to go source a lot of rubber bands and after you got the hang of it, it was pretty simple to put together this is the video I used for my main source of inspiration http://www.youtube.com/watch?v=vfwaaNjxUhY . I also only used a pack of 48 diapers as I had purchased a receiving blanket 4 pack off the mother's baby list and used one for the inside of the base and then the rest around the outside. Then I thought what is a Baby Girl Cake without loads of roses so I put loads of little sock roses all over the cake too! and then added a some teething rings, rattle, bath toy and the top layer is a onesie I printed with my Cricut using these instructions http://cleversomeday.wordpress.com/2009/04/25/freezer-paper-shirt-video/

Ingredients - cake

  • 48 size 2 Huggies diapers
  • 4 receiving blankets
  • 6 diaper pins
  • 8 pairs of girl socks individually made into "roses"
  • Ribbon from Michaels
  • Teething ring
  • Bath "duck" that measures water temperature
  • baby rattle that attaches to stroller/carseat

Now for the main purpose - my card!

I really bought this High Hopes stamp to use for Baby Showers because I like to have multi-function stamps. So I just had to use it and as it turn out one of the shower games was animals and what their babies are called - at least I got the Kangaroo one right!


The inside reads "can't wait to meet your Bouncing Baby Girl"

Ingredients - card

  • DCWV - prescored card and envelope, cardstock for mat
  • Neenah Solar White for stamping
  • High Hopes stamp
  • Memento rose bud ink, Palette Noir
  • Copics - didn't get the numbers sorry folks but I will say I am thinking they were E29, E31, E33, E35, E37 and RV00, RV21, RV23 though I really that is really a guess from what I put away yesterday!
  • Nestabilities - rectangles and scallop rectangles
  • Small brad "buttons"

I have a few more projects I'm just getting done but wanted to share this one. Hope you like!

Monday, May 18, 2009

Kitchen Sink Stamps Roses for Mother's Day

I love the multi-step stamps from Kitchen Sink Stamps. These are just no exception, once I stamp with them I can almost smell them. I love how subtle and elegant these stamps can be and I hope my card does them justice. In the past I used to send my mother flowers from half way around the world. Mom's present this year is a bigger project we are doing for her but I didn't want her to be without her flowers and to know we really love her.

Ingredients
  • Card Size - 5.5 in by 8.5 in
  • Cardstock - DCWV, Neenah Solar White, Michaels
  • Stamps - 3 step Hearts & Roses and Whole Family
  • Ink - Memento
  • Border punch - Martha Stewart
  • Ribbon - Michael's

Friday, April 24, 2009

Wooly thanks....

I have posted this card in my gallery on SCS from a quick scan. However I thought I would come to my blog and do it properly.

The image stamps are from
Clear Dollar Stamps and when I got the little sheep with my last order I just knew that these two sets had to be combined! Maybe it was living in England all those years and seeing sheep in the field with random markings. I don't know but I think it is one of those kinda funny things maybe its punny. I keep thinking, is this what they mean by "pre-dyed" wool?

The sheep stamp is a single (as you can just get a glimpse of inside the card) so I had to make about four masks of her to get this effect.

I do like the mottled effect of the sentiment though I know some people wouldn't. It reminds me a bit of the texture of knitting.

Critical eye - I think if I did this card again I would spell "wooly" as "woolly" - I looked it up and both are correct but the double "ll" is more correct. Also I would have the bottom of the feet of the sheep on the same level as the bottom of the basket. I would have put an insert in the card for the little grey sheep to be on - because as we know copic colors bleed through.

Copic lowdown - I know I don't have a list of Copic colors for this one as I actually made it before the fairy card. What I do remember is that the colors are pretty low numbers 00's, 10's and 20's for the most part, and the basket is mostly numbers in E 30's.

Ingredients
  • Cardsize - 4.25 x 5.5 in
  • Stamps - Clear Dollar Stamps, JustRiteStampers
  • Cardstock - DCWV premade base card, Georgia pacific, Hobby Lobby black c/s
  • Ink - Palette
  • Color - Copics
  • Tools - Nestabilities
  • Techniques - Stamping, Masking

Friday, April 10, 2009

Let it Rock, let it rock, let it rock...

Because when I'm alive, I can feel the fire. Make you come alive...

oh wait...

this is supposed to be a card blog, not a group sing-a-long! LOL! Someone out there in bloggieland knows what I mean and yes Treacle, darling, we are in the Naughties not the 80's. ;)
Another card I did for my son's birthday. I took him to his first concert, Live8 in Hyde Park 2005. We are still deciding if we need to do another gig soon, Franz Ferdinand is pretty near and then there are rumors that Kaiser Chiefs are supporting Green Day, ah but I digress again. I scanned the card so you can't really tell from the picture that the guitar is popped up.

Hope you like because I know people struggle with "guy" cards.

Ingredients

  • Card size - 5.5 in x 8.5 in
  • Cardstock - Georgia Pacific, Bazzill, DCWV Rockstar
  • Stamps - Inkadinkado
  • Ink - Palette, Memento, Brilliance
  • Color - Copics

Oh Boy - Card for an Egg Head

I'm truly blessed to be the mother of an incredibly bright young man, but don't tell him I told you so. He is currently working hard at maintaining his straight A's and is on the school's Academic Team as well.
So when I came across this VivaLasVegastamps image, I just had to use it for him! I hope he continues to try hard and accomplishes his dreams.

BTW the saying is JustRitestampers and it says "Massively" a bit of a play on the E=mc2 equation. Hope you like.

Ingredients
  • Card size - 5.5 in x 8.5in
  • Stamps - VivaLasVegastamps
  • Cardstock - DCWV, Georgia Pacific, Hobby Lobby
  • Ink - Palette
  • Color - copics

Tuesday, November 18, 2008

Flutter by, Butterflies for an 80th Birthday.

A card for our dear Auntie on her 80th Birthday day - I wanted a strong image but still feminine. I think I just about got there.

The main butterfly is from Kitchen sink stamps, stamped with Memento inks. I then put glossy accents over the image to raise it. Once that was dry I cut it out and embossed it with the square nestabilities. The dotted organza ribbon is from a selection I picked up at Hobby Lobby.

The small butterfly is vellum punched out with a Martha Stewart punch and colored over with copics to imitate the original stamped image.

Using JustRiteStampers I made up the greeting and stamped it directly on the card and used Martha Stewart black glitter over the 80 to highlight - dang that stuff is good.

Let me know if you like it.

Ingredients
Cardstock - DCWV, Georgia Pacific
Stamps - Kitchen Sink Stamps, JustRiteStampers
Ink - Memento, Copics
Accessories - Martha Stewart glitter and punch, Ribbon, Nestabilities

Thursday, November 13, 2008

Card and Lunchbox for Lauren

You know all that stuff you have "just in case" well this was definitely a "just in case card and project"! So see it does happen. You do NEED all those supplies just in case. LOL

I picked up the mini-lunchboxes at the Target dollar spot over the summer. The DCWV stack I just had to have as well as the square envelopes. This was one of those throw together cards that I needed yesterday and sent off with my youngest to a birthday party. After I covered the lunchbox with cardstock to match the card. Its just the right size for a gift card or the universal gift card as I call it - cold, hard, cash!


Ingredients
Cardstock - DCWV nana's kids, Georgia Pacific
Stamps - JustRiteStampers
Ink - Brilliance
Tools - nestabilities, corner rounder.