Tuesday, November 18, 2008

Flutter by, Butterflies for an 80th Birthday.

A card for our dear Auntie on her 80th Birthday day - I wanted a strong image but still feminine. I think I just about got there.

The main butterfly is from Kitchen sink stamps, stamped with Memento inks. I then put glossy accents over the image to raise it. Once that was dry I cut it out and embossed it with the square nestabilities. The dotted organza ribbon is from a selection I picked up at Hobby Lobby.

The small butterfly is vellum punched out with a Martha Stewart punch and colored over with copics to imitate the original stamped image.

Using JustRiteStampers I made up the greeting and stamped it directly on the card and used Martha Stewart black glitter over the 80 to highlight - dang that stuff is good.

Let me know if you like it.

Ingredients
Cardstock - DCWV, Georgia Pacific
Stamps - Kitchen Sink Stamps, JustRiteStampers
Ink - Memento, Copics
Accessories - Martha Stewart glitter and punch, Ribbon, Nestabilities

Sunday, November 16, 2008

Daisy, Daisy

When I saw the Edgeabilities Daisies I knew they would be Beautiful and they are - my problem was I used a textured card which probably wasn't the best choice for definition of the embossing. So I decided to give them some realistic color with my chalks. I then got out my Daisy stamps from Kitchen Sink Stamps - aren't they gorgeous?!?!?!?! All the wording is from Kitchen Sink as well. I matted the image on green to contrast with the golden colors so that the image panel would "pop" . I found a length of ribbon that I thought was suitable and just tied in the embossed panel colorwise with the main image.
I then put a white cardstock in side the card for the sentiment and decorated it with the daisy stamps.

What would I change? well when the card is absolutely closed the large embossed daisy at the top just overlaps the greeting and it doesn't look as nice as it should. Otherwise I really like how it turned out.

Ingredients
Cardstock - Bazzill, Georgia Pacific
Stamps - Kitchen Sink Stamps
Ink - Memento
Accessories - Edgeabilities from Spellbinders, Michael's ribbon, Chalks

Thursday, November 13, 2008

Card and Lunchbox for Lauren

You know all that stuff you have "just in case" well this was definitely a "just in case card and project"! So see it does happen. You do NEED all those supplies just in case. LOL

I picked up the mini-lunchboxes at the Target dollar spot over the summer. The DCWV stack I just had to have as well as the square envelopes. This was one of those throw together cards that I needed yesterday and sent off with my youngest to a birthday party. After I covered the lunchbox with cardstock to match the card. Its just the right size for a gift card or the universal gift card as I call it - cold, hard, cash!


Ingredients
Cardstock - DCWV nana's kids, Georgia Pacific
Stamps - JustRiteStampers
Ink - Brilliance
Tools - nestabilities, corner rounder.

Wednesday, November 12, 2008

Hoppy Birthday Grandson ....

This is what happens when my Clear Dollar Stamps and Copics collide, with a Kitchen Sink Stamp thrown in!

I decided I wanted to use my Scor-pal and create a gatefold and use the image to bridge the folds. After I colored in the images and did the background, I mounted it on bazzill cardstock and stamped the "GrandSon" from Kitchen Sink Stamps on the image.

I then colored in the "Hoppy Birthday" greeting and background and die cut them with oval nestabilities.

Ingredients
Cardstock - Georgia Pacific, Bazzill.
Stamps - Clear Dollar Stamps, Kitchen Sink Stamps
Ink - Memento
Markers - Copics
Accessories - Scor-pal, Nestabilities

Monday, November 10, 2008

13th Birthday

LOL! I always said I wasn't going to apologise for not blogging, that my blog is what it is and sometimes life or my attention on the recent national election gets in the way! Though I am sorry that my mojo seemed to go AWOL for October. Hopefully it has returned now.

This is a card I made in September. The cardstock is DCWV and the main image stamp is from Stampendous. I took color cues from the paper and colored in with my copics. I decided to make the image an organic shape , again a homage to the patterned paper.

Ingredients
Cardstock - Georgia Pacific, DCWV
Stamps - JustRiteStampers, Stampendous
Ink - memento
Markers - Copics

Wednesday, October 1, 2008

Popping Up to say...

I loved this stamp set the moment I saw it on Clear Dollar Stamps site - it's just so Squirrely! We always have to do the "Carling Ad" music when we see a squirrel - which seems to be quite often. As I don't know if this ad ever showed in the USA I'm sure people probably think we are quite mad (in the British sense of the word!).

As for the card, I did have to extend the tree trunk a bit. Its all colored in with my new favorite markers from Copic! including the background. The "SON" is from my new JustRite Stamps - they are so fantastically easy to use I don't have to worry about anything lining up all the work has been done for me!

Ingredients:
Cardstock - Georgia Pacific, Bazzill
Ink - Palette
Markers - Copic
Stamps - Clear Dollar Stamps, JustRite Stampers
Accessories - glossy accents (on the squirrel to give him a bit of dimension)
card size 5inches square.

Friday, September 26, 2008

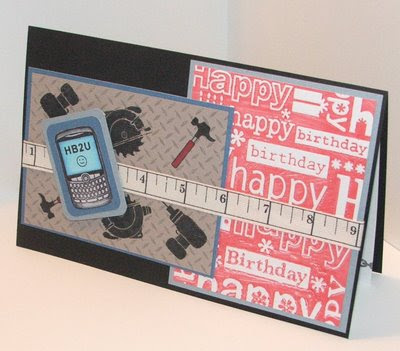
Manly card? I don't know but it suits the receipient!

I made this card a few weeks ago to send to my nephew who turned 20 (where did the time go I remember when he was born). He is passionate about Manchester United football club. I know you can put your sympathy wishes in the comments box. Because we love him we haven't disowned him for his poor taste! He is training as a carpenter and of course like every young person in England totes around his mobile. So although the images are rather jumbled they suit him and the occasion to a T (square!).

The embossing was with Happy Birthday cuttlebug folder that I inked up. The tool's segment is done with Clear Dollar Stamps Heavy Metal and Tool Time sets. The phone is a stamp from Stampendous. and the ruler is ribbon I picked up at Michaels.

I'm not over the moon with this card - However, it was the best I could come up with including all the elements I wanted to include so I hope he liked it.

BTW you wouldn't believe how long I took to colour in that phone!!!! I probably should have highlighted it all on its own! LOL

Ingredients-
Cardstock - Bazzill, Georgia Pacific
Stamps - Clear Dollar Stamps, Stampendous
Ink - Memento, Versafine,
Markers- Copic
Accessories - Cuttlebug "Happy Birthday", ribbon Michaels.

Thursday, September 25, 2008

3-step Hydrangea for our Auntie!

This is a card made for another auntie whose birthday was at the beginning of the month - another Kitchen Sink Stamps creation, this time combined with some new JustRite Stamps. I like this card although because I didn't put the stems/trunk between each level of the hydrangea I think it lacks a bit of grounding in color at that level. Truth be known I had done the urn in lovely greys and it was quite pretty but the whole image was a bit lost without the stronger colour at the base.

I used the monogram stamper and the memento inks to match the image on the sentiment. I then highlighted each flower center with a dot of glitter gel pen. I matted the sentiment to match the card and then highlighted the scallopes with white souffle pen.

Ingredients-
Cardstock - Georgia Pacific, Bazzill
Ink - Memento
Stamps - Kitchen Sink Stamps, JustRite Stamps
Pens - Sakura clear glitter and white souffle
Accessories - Nestabilities

Wednesday, September 24, 2008

3-Step Roses

Sorry about the photography in advance - I had to get the pictures done. No sunlight. Yadda, yadda, yadda I think you get the idea.
The rose stamps are by Kitchen Sink Stamps - isn't that stamp just gorgeous. I don't think I really do it justice. I use Memento Ink for the roses in Dandelion, Canteloupe and Tangelo; the leaves are in New Sprout, Pear Tart, Bamboo Leaves, and Cottage Ivy. I then used Versamark marker and clear embossing powder over the image. I then did the background with Distress Inks in Peeled Paint, Weathered Wood, Faded Jeans. The greeting is from Kitchen Sink whole family set. - isn't is just gorgeous.

This was another attempt to Zindorf as I now call it! Her blog is an absolute work of art. I really should be ashamed to say that I have attempted to work as she does but I find her such a true inspiration. I just hope that one of these days I get somewhere near.

This card was for a favorite auntie of my DH and truthfully even though I got it done in time somehow it didn't get posted until late. Still I hope she enjoys it and enjoyed her day. I probably should be ashamed of that too! At least she knows we were thinking of her on her day AND cared enough to not just run out and buy something and send it quick. Her son is a graphic artist so I think she probably has an appreciation for some of the artistic things I attempt.

Ingredients-
Cardstock - Georgia Pacific, Bazzill
Ink - Memento, Ranger
Stamps - Kitchen Sink Stamps
Accessories - organza ribbon from Hobby Lobby

Friday, September 12, 2008

Another fine mess!

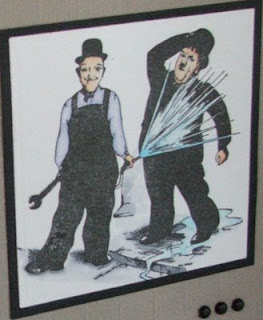
This was my husband's favourite (and yes I have to spell that in English not American because that is the way he speaks) card. He is a mad (another English-ism) Laurel & Hardy fan and when I saw this stamp on VivaLasVegastamps website I knew I just had to get it!

The image is stamped with Palette noir and colored in with Copics (I know they have such vibrant colors!) they had just the right subtle quick colors that I needed for this. Gotta love those grays again! And the skin tones were just what I needed.

I cut out the image with my square nestabilities and embossed the edge. I then cut a mat with the nestabilities in a very "manly" black.

The gray card is Bazzill which I scored into a grid using my Scor-pal. Now what did I ever do without that - it really does make scoring so much easier than it was when I used to try to use my trimmer.

The second stamped image of the clapboard is another from VLVS and the greeting is from my collection of See D's - they almost look like they were made for one another.

So, I guess the question now is - do you think my DH was right in his preference?

Ingredients:
Cardstock - Bazzill, Georgia Pacific
Stamps - VivaLasVegastamps, See D's
Ink - Brilliance
Markers - Copic
Accessories - Nestabilities, brads by Making Memories, Scor-Pal.


Thursday, September 11, 2008

Zog Calling!

That title probably makes more sense in my head! We as a family always tease one another that we are from the planet Zog and I recently met an internet friend who's family share the same ancestry. LOL

So when I saw this stamp set from Technique Tuesday I had to have it because I knew I would use it!

I think in the end it worked out pretty well. I used my Copics again. some clear embossing to make the little green men shine a bit as well as Earth. Though just a word of warning - clear embossing doesn't act as a mask when using Copics... ask me how I know! LOL

I really like how the atmosphere to space turned out on this card and it was my dear hubby's second favourite card for his birthday.

Ingredients
Markers - Copics
Cardstock - Bazzill, Georgia Pacific
Stamps - Technique Tuesday
Ink - Brilliance
and a bit of detail clear embossing powder.

Wednesday, September 10, 2008

It looked better in my head! Honestly it did!

Well, according to my promise to show the good, the bad and the ugly. This one ranks up there with the it looked better in my head.

I started with the red background... it was going to be a blended red background with the bird stamped on the front. The red blended background quickly became a sunset.

To be honest with you - I really don't like this card at all but I do like some of the stuff I did on it.

I like the black sillouette. I like the bird with the white highlights - thank you Michelle Zindorf! what an inspiration she is and now if you go look at her blog you will just realize how badly I FAILED! Still as you can tell this was a card for the dear Hubby and he liked it - just not as much as the other two I made. Glad I married a smart man who knows better than to criticise! ROFL

Ingredients:
Stamps - Inkadinkado, Kitchen Sink Stamps
Ink - Palette
Markers - Copic
White Sakura Gel Pen
Cardstock - Bazill, Georgia Pacific.

Monday, September 8, 2008

Where O' Where has the time gone! my Copic 1st.

Yikes! I keep intending to post but end of summer festivities have gotten the best of me! Hope everyone is doing well, and those with kiddies have gotten them back off to school safely now.

I wanted to share this card - it is my first card with Copic markers. I love those markers they are so easy to work with and blend. And isn't this just about the cutest Elephant stamp ever!
This is also a card where I used every gray Copic in that group that I own! I know alot of people don't know when they will use the grays but I just wanted to give an example for everyone. I know I'm not the world's greatest colorer, but I think their are a lot of people out there that underestimate the usefulness of grays.

I then picked out a nice pink for the bow... well once I got it down on the cardstock my my my it was bright!... So out came my grays again!

Ingredients
Rubber Stamps - High Hopes
Ink - Palette; Copics
Cardstock - Georgia Pacific; DCWV
Other - Nestabilities circle and scallops; ribbon from Michael's.


Thursday, August 14, 2008

A bright Changito Birthday!

This is a card I made for a dear friend in Scotland who not only takes care of her family but decided to take Open University and is doing great! Free Smiley Courtesy of www.millan.netI really don't know how she does it all she is fab!

I took my cue from her cardmaking style - she almost always has bright cheerful cards with clean lines (now watch her go and change on me!) and detail. I was going to do cupcakes - everyone loves cupcakes AND she had sent me a card for my birthday with cupcakes... but it just didn't feel right. I wanted to celebrate her strength and her getting her courses sorted. So I found my Changito, Stampendous stamps and they just made sense for this card.

This is a BIG card 8.5in x 5.5in front or A9 whatever works in your brain!!! I love Big cards for special occasions.

The card base and colorful solids are out of the DCWV brights pad. I scored it pretty successfully with my Score-Pal. I then pulled out some my patterned cardstock from DCWV Nana's Kids (I love the vibrancy but just find it difficult to use any patterned cardstock/paper!) I also needed to use ribbon on this card - lots and lots of ribbon - so I cut a band of white and covered it with the ribbon and adheared that to the card base. Changito and his books were colored to match the cardstock choices with Prismacolor pencils on GP cardstock and cut with my rectangular nestabilities.

The envelope and insert where stamped with lined paper background from Cornish Heritage Farms and Stampendous school and Changito stamps sets. I used Brilliance ink on my brand new to me Kitchen Sink Stamps greeting. *insert happy dance!*

Ingredients
Cardstock - DCWV, Georgia Pacific
Stamps - Stampendous, Cornish Heritage Farms, Kitchen Sink Stamps
Embellishments - Michael's ribbon
Color - Prismacolor pencils, white gel pen Sakura
Ink - Brilliance

Tuesday, July 22, 2008

Ipod and Jeans Birthday

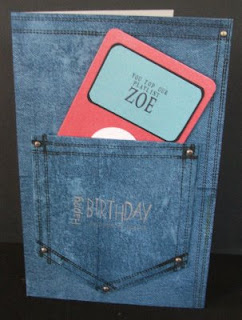
Well, take a great card and a great stamp that you can't find anywhere and sulk about it for six months and this is what you come up with. However I digress and should start at the beginning...

In January I found this great blog entry Just Give Me Stamps and like everyone that sees a great card I HAD to have THAT stamp... well I search and search and no luck so I decided to think outside the box. I ordered a denim backgrounder from Cornish Heritage Farms.

I started this card with 2 sheets 5.5in x 8.5 in white GP cardstock that I wiped faded denim distressed ink over. I then took my denim stamp and stamped over the cardstock to get the jeans look. Playing with the Scor-pal I made gussetted folds the pocket would hold the "Ipod". I then stamped the stitching with Graphite black ink (and yes I hold my hands up that the stitching could have been neater but heck, these are old jeans *WINK*). Then with the cropadile I punched through the layers of the pocket and once in the upper right corner of the card base and attached the brads. Then I attached the front to my card base and stamped the See D's Happy Birthday greeting on the pocket with platinum planet.
Now on to the "Ipod" - I took a sheet of pearlescent cardstock and cut it at 3 inches. Then I took the Scor-pal and scored it at 6 inches and also 1.5 inches from the ends. The screen is blue pearlescent cardstock backed with black and the circles I cut with Quickutz cookie cutters circle dies (my circle Nestabilities came the day after I finished this!). I then got my Just-rite monogram Stamper out and made the sentiment for the screen. The folds on the inside of the ipod are just the right size to hold a nice check (cheque for you Brits) as well!
So I'm hoping that this is just about the perfect card for a teenager no matter what their interests are!

Thursday, July 17, 2008

A Justrite gift!

I picked up the Just-rite monogram stamper last Wednesday and was so excited to get it out of the box then I thought I was going to have to stand on my head to get the border on - I found out on SCS that I had a defective one so I contacted Just-rite directly and told them my problem. They emailed me right away and we sorted it out and I received my replacement stamper in the mail on Monday! Can you believe it what great customer service that is? So a Big Shout out to the Just Rite time and just in time so I could make this gift to send to my neice.

I took a leaf out of Lauren Meader's blog entry and did the first name and then last initial. My color choices were dictated by the ribbon. I cut my circles with my Quickutz cookie cutter dies - my nestabilities circles are making there way to me at the moment but alas too late to get this done and in the post. I inked up my monogram stamper with some Versacraft cherry pink. The small dots in the border are highlighted with Sakura clear glitter pen. The green cardstock is from a selection I picked up at Wally's world and has a slight sheen too it - I just had to run it through my cuttlebug paisley folder!
The folio idea I picked up while surfing on Splitcoaststampers. I made by playing around with numbers and my scorpal - there are still a few tweaks to make it better and I am certain there is probably a brilliant tutorial out there that I just couldn't find when I needed to get this done... in the end because of the thickness of the note cards I went back and scored in gussets where I could to accomodate this. I decorated the front of the folio using the same cardstock through the cuttlebug with the cuttlebug paisley die that I just had to have and then hadn't used.

I also sent my neice a birthday card with this set. I will post that next time!

Oh and I have added a link to the side where you can get FREE TEMPLATES to use on your own or with your cricut and I think sillouette so have a look!

Recipe
Ink - Versacraft cherry pink; Sakura clear glitter pen
Dies - Cuttlebug
Embossing - Cuttlebug
Embellishments - Michael's ribbon
Paper - Georgia Pacific and ? Colorbok
Cardsize - notelet (4.25in x 5.5in)

Tuesday, July 8, 2008

Ladybug? Ladybird? Graduation Card.

I never know what to call an "LB" anymore - Ladybug is American, Ladybird is British so I think the darling little bug will just be LB from now on! LOL.

This card is for my Auntie in Alaska who just graduated college for nursing! WOOHOO! She absolutely lurves ladybugs so I took my inspiration from there. I decided to use the swiss dots cuttle bug folder to emphasize the dots on the LB and again I chose the ribbon to tie in. The circle was cut from the front layer first and is a Quickutz cookie cutter die. I put the solid circle aside and put the cardstock through my cuttlebug with the swiss dots folder x 2. I then used my Fiskars trimmer to score two lines and then stamped my greeting from Hampton Arts. I then measured my greeting so I would know where to score the bottom two lines and flipped the cardstock over and scored. After that I sent it through with my swirls folder. I then went over the top of the Congratulations with a graduation cap stamp and my versamark and clear embossing powder. I placed the organzaa ribbon to highlight this and be a color tie to the main image. I then mounted this on the black card base.

The lady bug image was stamped with Brilliance Graphite Ink and colored in with Sakura glitter pens. I then went around the circle making dots my black marvy pen. Then I just had to tackle the "nekkid" envelope too! This time I colored in the LB's with permanent red ink. This was added to the "hole" I had made earlier using 3-D Zots for dimension. After I took the picture I added an insert with a LB on the corner too! I really hope she likes it!

Sorry for the blurry close up! just trying to show the elements together and the clear embossing!LOL

Ingredients
Ink - Brilliance Graphite Black
Stamps - Unknown, Hampton Arts
Embossing - swiss dots, devine swirl, Fiskars trimmer
Pen- Marvy, Sakura

Monday, July 7, 2008

SWEET!

This is a notelet sized card that I made to send to my "cardies" last month, as one of our group calls us! The stamps are from a too cute set from Technique Tuesday called "Icing on the Cake". I wanted to use this set and really started off thinking about cupcakes - I mean have you seen all the fabby cupcake cards there are around and then I thought - HMMM maybe I should just save cupcakes for birthday cards because I have so many of those to do - well for me - and can never think of an idea and who doesn't like cupcakes etc. So after I finished my internal dialogue with myself. I decided it is summer and I NEED some ice cream and even better this is the ZERO calorie kind. Now we are talking!

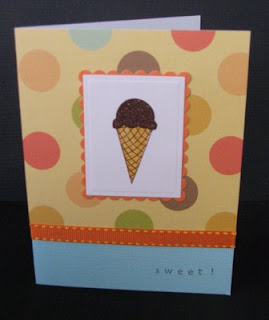
So this card started with cutting and embossing the white cardstock out with my new nestabilities (oh I love those things!) I stamped the icecream stamps on the cardstock using versamark for the ice cream itself and gel-a-tins chocolate embossing powder - yum! Its not an overpowering smell but it is there! I also made a scalloped frame for them, at this point I chose orange - I just think it so refreshing for summer and I had already played around and decided that I would have chocolate ice cream and then the blue base card just seemed to make it come together. Then I went looking through my designer paper that I had bought ages ago and had never used - you know when you think its too good to use! and found this K&Company Brenda Walton Neopolitan paper - now how perfect is that! (I know you probably already knew about it!). I just then had to sort out a sentiment for the front and some ribbon and Voila!
Ingredients
Stamps - Technique Tuesday, Stampendous alphabet
Ink - Adironack Caramel, Adirondack Expresso, Versamark
Embossing powder - Gel-a-tins chocolate bliss
Diecutting - Nestabilities
Designer Paper - K&Company Brenda Walton
Embellishment - ribbon from Michael's

Friday, July 4, 2008

4th of July Birthday!!!

I guess I really should have more subtle titles - or maybe just sub titles as I know my brain and my thoughts don't always marry up!

Well today is a very special day - it is our entire little family unit's first 4th of July together or as the DH calls it Colonial Day. Honestly how can you argue with him! lol His uncle used to tease me that England were just seeing if the US could manage on their own... that was over 15 years ago, I think he may have been on to something. HMMM

I guess I better give you the heads on the card - its for a dear friend of mine in England - I have to say I was inspired by the artwork of this blog http://zindorf.blogs.splitcoaststampers.com/ (I know the work there is fabulous but keep coming here too please! I'm begging you here people! LOL)


I stamped my main image from High Hopes and colored her in using prismacolor pencils and baby oil. I then framed the images using the star border from Technique Tuesday stamped with platinum planet ink and clear embossed the stars. I decided to mask the main image and then sponged Distressed Ink in Fired Brick and then in Faded Jeans. I then stamped my denim background from Cornish Heritage Farms using my Adirondack denim pad. The stars are quickutz diecuts and then colored with the Fired brick and the platinum planet and adhered with 3D zots. The See D's greeting was stamped with the Adirondack denim pad and then highlighted with the distress pads. The card base is Archiver's own cardstock linen blue.

Hope you like and have a safe and happy 4th of July!

Ingredients:
Stamps - High Hopes, See D's, Technique Tuesday, Cornish Heritage Farms
Color - Prismacolor pencil
Ink - Adirondack, Distress ink, Brilliance
Dies - Quickutz
Tuesday, July 1, 2008

Bouncing Baby Boy!

Another boy card! Thankfully I just have these too cute stamps from High Hopes - it just makes it difficult to decide which one to use! There really must be something in the water with all these boys!
I AM happy with this card, I have to say. Though it is nothing like my original vision in my head! Does anyone stick to their original idea all the way through a card? I was inspired by the Heartprints Gallery - some really amazing things there! I actually started to do this as an all white front with the Kanga on a raised embossed section - although "nice" it was just too white for me! So I made my swiss dots embossing into a frame (had to send that baby through twice AND poke some of the dots back out with my embossing tool). Kanga is now cut to show the shading and raised from the base with 3-D Zots. BTW - this card is 5x7 - I just like BIG cards for BIG occasions!

I really think I need a Scor-pal. I have been trying to talk myself out of one but I just don't seem to be able to get the nice deep grooves that so many people are getting without one. The ribbon is attached with the brad alone thanks to my cropadile through three layers of ribbon and one layer of card!

Gotta love that Baby Oil technique and any residual "smell" is just oh so perfect for this occasion! LOL

Hope you like!


Recipe:
Cardstock - Georgia Pacific, DCWV pastel blue
Stamps - High Hopes
Ink - Adirondack Espresso, Brilliance Graphite
Color - Prismacolor pencils
Embossing - Cuttlebug folders - Swiss Dots and Perfectly Paisley, Fiskars trimmer
Ribbon - Michael's
Brads - Making Memories

Friday, June 20, 2008

Cuttlebug anniversary

Well I really can't take any credit whatsoever for the design of this card - I was inspired by the creations Heartprints Cuttlebug Gallery you have to admit they are just scrummy and so effective.

The receipients of this card are my Brother-in-law and Sister-in-law in England - their anniversary is Sunday AND I know it won't get there in time but still sending them lots of love as they celebrate their anniversary - the world can always do with more love.
Big note to self - I need a stamp for the "Happy Anniversary" - I nearly made myself cross-eyed lining up all those letters! You really can't tell by the photograph (which was taken about three seconds before I popped it in the envelope and sent it on its way) but there are embossed lines to separate the sections.
Ingredients:
Embossing - cuttlebug stylized flowers and devine swirl, Fiskars trimmer
Stamps - My Sentiments Exactly
Ink - Versamagic Dew Drop chalk ink in Pixie Dust, Spring Pansy and Aloe Vera; Sakura gelly roll stardust clear.

Thursday, June 19, 2008

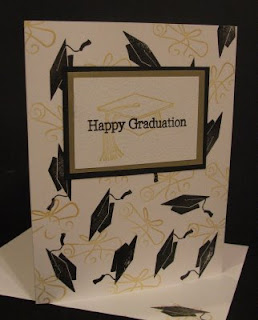
Graduation card


I'm one of those bloggers that doesn't believe in apologising for absences - if we aren't out there living life then really what is the point? Back to the regularly schedule broadcast!

I'm not certain what I feel about this card. I put it together quite quickly for a High School graduate because I really just couldn't get my head together to get things done. My mojo definitely went on walkabout. I have cards and gifts now that I "owe" - don't you just hate when things get like that... I'm going to keep trying to aim to be ahead of the game, however because that is the way I am!

Anyhoo! - enough of me yattering away! Here's the important info!

Ingredients:
Cardstock - Georgia Pacific, Hobby Lobby textured, iridescent gold vellum
Stamps - Hero Arts, Northwoods Rubber Stamps
Ink - Brilliance graphite black and galaxy gold


Friday, May 23, 2008

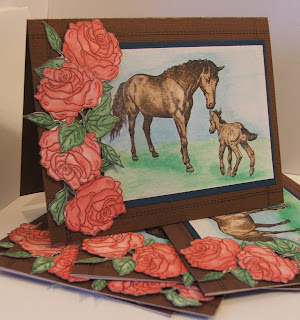
Run for the Roses

Well this card was inspired by the Kentucky Derby (which is also called "The Run for the Roses" in case you didn't know). I enjoyed making it for my Cardi-friends but I don't think I will ever have the BRIGHT IDEA to cut out 20 roses again! LOL

I think I misplaced my mojo- I have loads of cards to do today and I just can't seem to get started... Oh well I hope I get something sorted soon! Take care and thanks for looking!

Ingredients
Stamps - Stampabilities, See D's, Technique Tuesday
Cardstock - DCWV, Bazzill, Georgia Pacific
Color - Prismacolor Pencils, Archival Ink

Tuesday, May 20, 2008

Bouncing baby boy!

Here are a couple of cards I have made for a friend and her family on the safe arrival of their little boy. I feel a bit giddy because I have what my husband calls a "lovejob"* order to do another similar one for another couple having a boy at the end of June. Still and order is an order and its my very first - so needless to say I am absolutely delighted!

*lovejob - you do because you love them and don't expect to get PAID!

Ingredients:
Cardstock - DCWV pastels, Georgia Pacific. Archiver's
Stamps - Main Image - High Hopes
- Alphabet - MSE, Stampendous
Color - Prismacolor pencils
Ink - Archival Jet Black, Adirondack Espresso, Tsukineko Dew Drop Summer Sky
Ribbons - Michael's
Brads - Making Memories

Friday, May 16, 2008

WILD for you!

This is the card I made for DH for our anniversary - even after all these years I'm absolutely WILD for him! He really is the greatest.

The main image stamps are from High Hopes stamped with Archival Jet Black. The sentiment was made with Stampendous alphabet stamps for the small letters and My Sentiments Exactly for the "WILD" - stamped with Cosmic Copper Dew Drop ink. All colored in with the my trusty Prismacolor pencils and baby oil technique. I decided to keep all the colors muted (read masculine LOL) and tonal. The base cardstock is Blue Linen from Archiver's, with the image mounted on brown Bazzill.

Ingredients
Stamps - High Hopes, Stampendous, MSE
Ink - Archival Jet Black, Cosmic Copper Dew Drop
Color - Prismacolor pencils
Cardstock - Archiver's, Bazzill, Georgia Pacific

Wednesday, May 14, 2008

Mother's Day card


Well this card was inspired by the Accordion Card on the Papertake Weekly Challenge last week, that Jukie clued me in on for an idea, and then I looked today before I uploaded and my card seems to fit this week's challenge too! So I am going for it - I can only be wrong (right?) and if I am I'm sure I can live with it either way! LOL

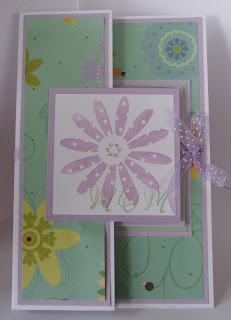
This card was made with some bold DP that I don't know the make of (I would hate to admit how long I have had it)! layered on some DCWV pastel green and lavender cardstock. The dotted organza ribbon is from Michael's and the stamps are Stampedous, Inkadinkadoo, and Hero Arts. The ink is Tsukineko 's Versamagic Dew Drop chalk ink in Spring Pansy and Aloe Vera. AND yes the dots in the flower inspired me to use the dotted organza! Oh and they don't show on the flower so much but each dot in the center of the stamped flower on the front has a dot of glitter glue on it for a bit of BLING!
You can't quite make it out but I used the stamp on the front again on the last "topper" that we wrote messages on for my mother. Hope you like!
Ingredients
Cardstock - DCWV, Georgia Pacific, unknown patterned paper (let me know if you know!)
Ink - Tsukineko's Dew Drop in Spring Pansy and Aloe Vera
Stamps - Inkadinkadoo, Stampendous, Hero Arts
Ribbon - Michael's

Sunday, May 11, 2008

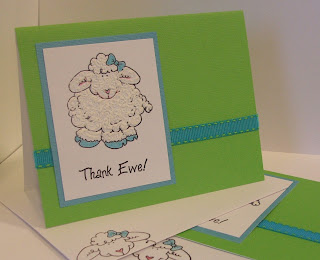
Thank Ewe!

Well today is Mother's Day here in the US and as I didn't finish my mother's card until very early this morning (you just can't rush the creative process ) LOL.... so I haven't taken pictures of it yet, though she said she loved it!

I have however, taken pictures of this "Thank Ewe" card set that I am sending out for some Easter gifts the children received (yes, I am that far behind!!!! I'm wondering if I will ever catch up YIKES).
Take care everyone! and remember to tell your "Mother" just how much you love her and thank her for bringing you into this world!

Ingredients:
Stamps - High Hopes
Ink - Archival Ink jet black
DCWV cards and envelopes, cardstock
Michael's dots and stripes grosgrain ribbon
Decoration - prismacolor pencils, baby oil, liquid applique


Monday, May 5, 2008

45 pints of beer on a card, 45 pints of beer, take one down....

LOL I made this as a belated birthday card for a dear friend of ours! He has a keen interest in Beer and Bourbon so I thought while he was dreaming that he might just dream of beer too! So the bloke in the hammock is meant to be him and the background is what he is dreaming of!

The inside sentiment reads - "We wanted you to know that we didn't forget to send your birthday card... we just got overwhelmed by the amount of taste testing"

I've sent it so I'm hoping to hear soon whether he likes it in real life or not however, it passed the first male test, when I ran it past DH so I'm hopeful! LOL


Ingredients:
Color - Archival Jet Black, Prismacolor pencils (oderless mineral spirits technique)
Cardstock - Georgia Pacific, Hobby Lobby
Stamps - VivaLasVegastamps, See D's Boys Toys, My Sentiments Exactly
Extras - glossy accents, brads, ATG

Friday, May 2, 2008

Asian April

I know we are in May now in fact we are in the throws of the excitement of the first Saturday of May and exactly what it means in Kentucky!

However, I digress. The topper is the same as the previous post, however I used it with focus on highlighting different colours. Its funny how just changing the colors can make things appear differently.
I have to admit, it's not my favorite card of all time however, I like it... I just don't love it!
Ingredients
Color - Prismacolor pencils, Adirondack Espresso, Archival Jet Black, Tsukineko
Cardstock - DCWV, Georgia Pacific, Tissue paper
Stamps - I Brake for Stamps, Studio G
Recipe
SCS - Faux Silk.

Wednesday, April 30, 2008

A little Thank you!

Well I know I have been a bit quiet on the blog front but life definitely hasn't been quiet at all! I've got a few bits and bobs to share once they get to their receipients (which would probably help if I actually posted some of them! LOL.


So here is a card I have actually posted. I used the Faux Silk technique off SCS.

Ingredients

Stamps - I Brake for Stamps, Stampendous

Color - Tsukineko Dew Drops, Prismacolor pencils

Cardstock - DCWV

Hope you like!